jasonX
Bardzo aktywny
- Dołączył
- 23 Październik 2015
- Posty
- 151
- Reakcje/Polubienia
- 987
Crazy Talk Animator 3 PRO - 2D Animation Software: Short Review
When we were kids almost all of us were exposed to cartoons and animation. We adored them and emulated them especially superheroes! Most of us wanted to draw them on paper (and even in walls) like the ones we see in the TV. We draw and color them with crayons. Those that are artistically inclined paint them (not me!). When we all grew up we still have a glimpse of them from time to time and we view them in awe compared to the technology that was used previously. Take the case of DC Comics "Justice League" compared to the "Justice League: Superfriends" of the mid 70's or 80's, the Batman cartoon series and of course the Avengers of Marvel. Cartoons and animation per se holds a dear part of our lives when all were not so complicated and we had less to worry about (--aside from what kids often worry that is...). Those were the days
")
Now as we go about our day to day activities (which are mostly related to our line of work whether it be IT, business, politics, sales, manufacturing etc.) sometimes a need surfaces for us for our family or for ourselves, say, more vacation time with the family/kids, gigs with the girlfriend perhaps, night-out-drink with the boys, the list goes on. In those events we always take videos/pictures to help us remember that particular event. And then the next thing is either YouTube, Facebook or just a plain DVD or video file for the home viewers. The ones that are funnier we like the best. What if you can make it a notch funnier by making an animation of those image/part (of an image) or insert animation (in the case of videos)?
Yeah that would be great but the thing is (often) we do not know where to start. To those who are learned in Adobe very good for you! You can do any animations with Adobe Suites! You guys are a cut above the rest! Way above as I have been on a steep learning curve with it when I started and that was years ago. Heck I still don’t know most of the nifty tricks with Photoshop, Image Ready, Premier and After Effects. I guess if my fingernails were indeed "nails" my head would have scars as if a big darn cat scratched it deeply many times! I can manage now but the "self-learner" that I am says the learning curve is steep for me. Many thanks to YouTube learning is now within grasp and for free.
Animation need not be that difficult nowadays and there are plenty of paid and free versions to checkout (all we need is "time" and "leeway" to do it). One such software is Crazy Talk Animator. Crazy Talk Animator comes from a long line of 2D/3D animation software developed by Reallusion, Inc., pushing the boundaries of animation to a whole new era of ease-of-use and flexibility similar to the ones we see in After Effects and Flash animations. While not original in making animations via skeleton or bones-rig-manipulations, Crazy Talk Animator makes it simple to animate via its smart animation and puppet mode and that's just a start! CrazyTalk Animator comes in 3 variants which are: (1) Standard, (2) Pro and, (3) Pipeline.
1) Standard - primarily targeted for the beginner and casual animator in you. Equipped with the basic standard features that you can use to start an animation of your chosen character.
2) Professional - designed for novice to intermediate animators and has full blown features including animation styles like the bone editor for character rigging and attachments, 3D motion key editor and application of multiple render styles.
3) Pipeline - designed for the professional animator and extends more granularity in addition to having all the professional features. Customization of characters/motions/styles are provided as well as import of 3D motions and the creation of characters from Adobe Photoshop. Pipeline version is the premium version that will rival the popular Moho Pro.
This is a short review of Crazy Talk Animator Pro to show what this nifty piece of animation software is capable of doing (just a small part of its capability) what it can do for the imagination in all of you.
CrazyTalk Animator (CTA) is the world's easiest (aims to be) 2D animation software that enables all levels of users to create professional animations with the least amount of effort. With CrazyTalk Animator 3 (CTA3), anyone can instantly bring an image, logo, or prop to life by applying bouncy Elastic Motion effects. For the character part, CTA3 is built with 2D character templates, valuable motion libraries, a powerful 2D bone rig editor, facial puppets, and audio lip-syncing tools to give users unparalleled control when animating 2D talking characters for videos, web, games, apps, and presentations.
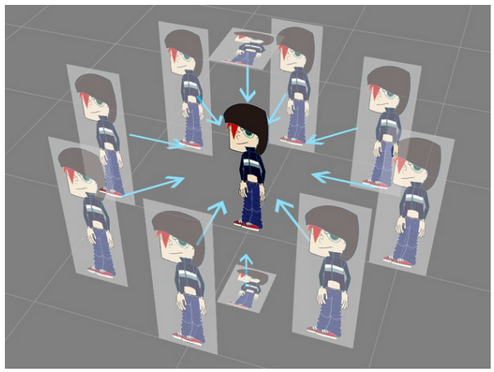
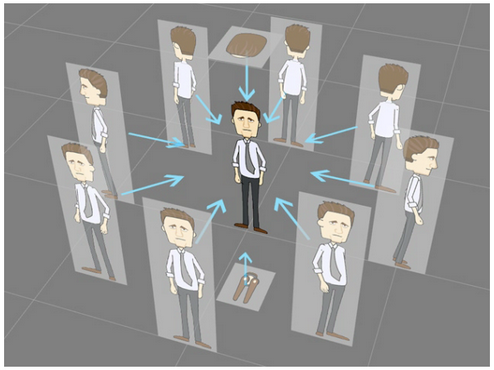
Its early sister, CrazyTalk Animator 1 (CTA1) already had superb facial animation for animating faces inside photos and line drawings (still images of painting etc.) while in 2D. Now with CrazyTalk Animator 3 (CTA3) you can animate not just the face but the entire body as well and with a larger environment or stage. Reallusion has made CTA3 a notch higher making the user manipulate a 3D skeleton generating up to 10 different 2D view angles thus having the ability to use 3D animation tools to manipulate characters and allow them to interact with props/elements and other character as well while still in the appearance of 2D space.
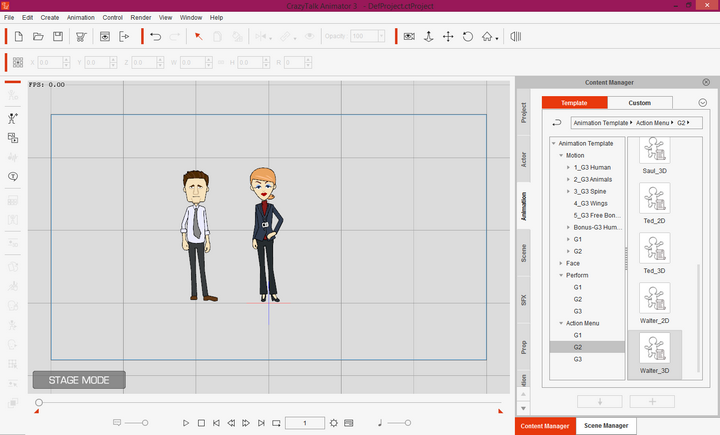
Take a look at the built-in characters I tinkered with (you can replace those with your own cut out photo or of the head/face or whole body) just to make you see the animation that you can do with CTA3.
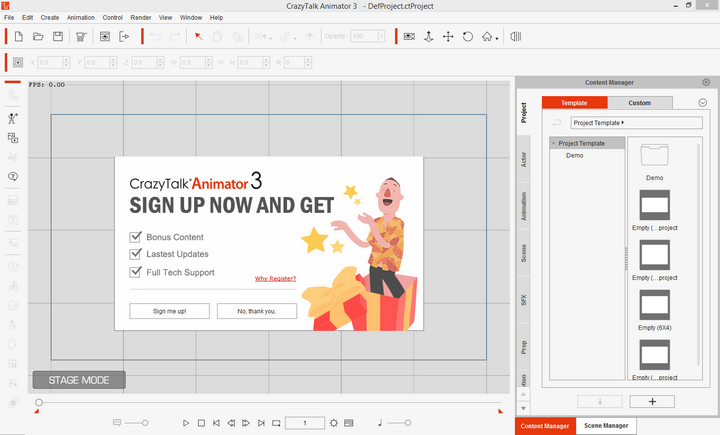
The CTA3 Interface Environment
The main user interface is in 9 parts.
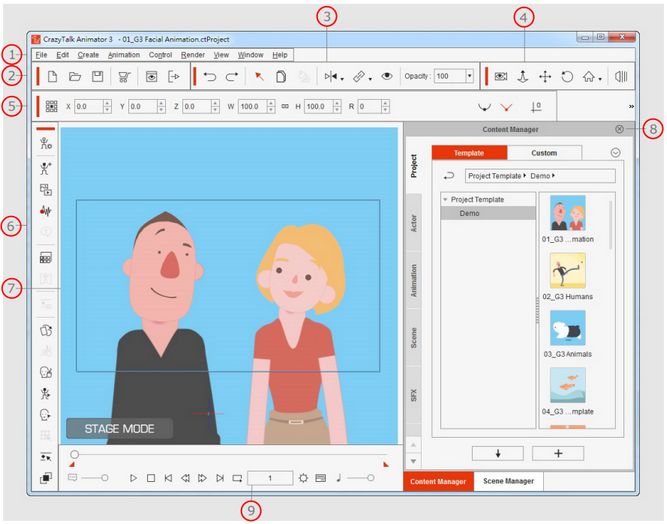
1 - Main Menu -- contains all the general commands of CrazyTalk Animator
2 - Project Tool Bar -- where you can Open, Save, Create a new project, Preview an image of the current frame, or export your project.
3 - General Tool Bar --this is where you undo/redo actions, select characters/objects, merge selected props, duplicate character/objects, set actions such as flip, link, visible/opacity keys to characters/objects.
4 - Camera Tools Bar -- here you can switch between Preview Camera Mode and Live Camera Mode, zoom in/out of any scene, pan/rotate camera, switch to different view modes of the camera and go to 3D mode.
5 - Property Tool Bar --where you can view/use property tools for the character actors, props, sprites, effects to enhance the details of the 2D/3D animation project.
6 - Functional Tool Bar -- this tool bar you can use when switched to Composer Mode, create characters/objects, add voice scripts for the chosen character actors as well as generate motions/animations. This is also where you can modify text, render styles and the runtime editor for the characters of your choice. You can invoke key functions as Action Menu, Sprite Editor, and Puppet Editor, 2D/3D Motion Key editor and Layer Editor Panels.
7 - Preview Window -- which is the working area, where the character/props in the scene or project are as well as export the range bounded in the Safe Area can be observed.
8 - Content Manager -- (can also be accessed via F4 key), keeps embedded and custom content (presets/templates) you can apply to your project. The Scene Manager, displays all the character/objects included in your project.
9 - Play Bar --contains the basic playback tools at your disposal for previewing character actor voice, motion and background music applied as well as button to bring up Project Settings and Timeline panels.
Sprite Concept Overview
A "Sprite" is the elements in a character, head or a prop.
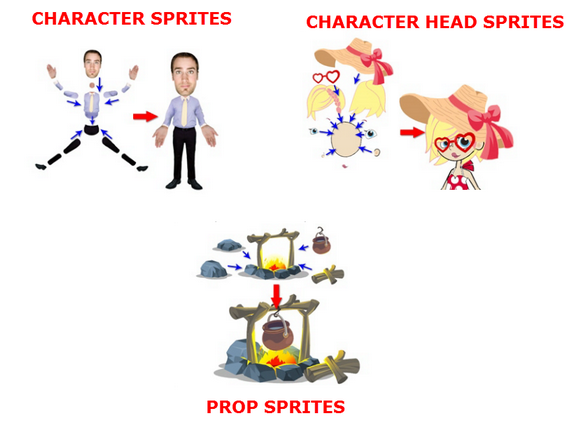
CrazyTalk Animator characters are capable to perform dimensional motions and expressions which is generated by displaying the different components in sprites and within sprites that compose a character actor’s body/face. The sprites on the bones changes in relation to the angles specified or set so as the dimensional motion/expression is created. As seen in the image above, a sprite, can have multiple elements. Take a look at the body parts of the "character sprites", each part there or sprite composes that one character body. That's about 15 parts or 15 sprites there.
Edit a texture of a sprite.
Again take a look at the image above and each sprite is "exploded-blown-out" image of the body parts there. You can edit each sprite there and CrazyTalk Animator lets you go to Photoshop (or any image editor you have, just specify it in the settings) directly via the "Launch External Image Editor". From there you can do editing based on your preference. Later in the final rendering of the sample video for this review you will see that I have used this function to edit Mr. Bean's character to have a different color of necktie as well as edit of the face and facial colors.
Head Types Overview
There are 2 main categories of heads in CrazyTalk Animator, they are; (a) Morph-based, and, (b) Sprite based.
Morph-based head is done by projecting an image onto a surface with a dimensional and protruding shape of the face. The eyeballs and teeth are placed behind the surface. If you will create one from scratch it is done in the Face Creator.
Sprite based heads are composed of sprites of a face and different facial features. You are able to create and modify this type of heads via the Sprite Editor in Composer Mode. Elements in a sprite can be:
(a) Image -- in JPG, JPEG, BMP, GIF, PNG, TGA formats.
(b) Video -- in AVI, WMV, RM, RMVB, MPEG, MPG, MPE, MP4, ASF, ASX, WM, FLV, MOV and popVideo formats.
(c) Vector images -- SWF format.
Body Types Overview
Characters in CrazyTalk Animator are all sprite based body. So they are composed of sprites with body parts or entire body images. As in "Sprite Head types" you can edit/create and modify these sprites in the Sprite Editor via Composer Mode. As with above elements in a sprite are the same:
(a) Image -- in JPG, JPEG, BMP, GIF, PNG, TGA formats.
(b) Video -- in AVI, WMV, RM, RMVB, MPEG, MPG, MPE, MP4, ASF, ASX, WM, FLV, MOV and popVideo formats.
(c) Vector images -- SWF format.
Character Types Overview
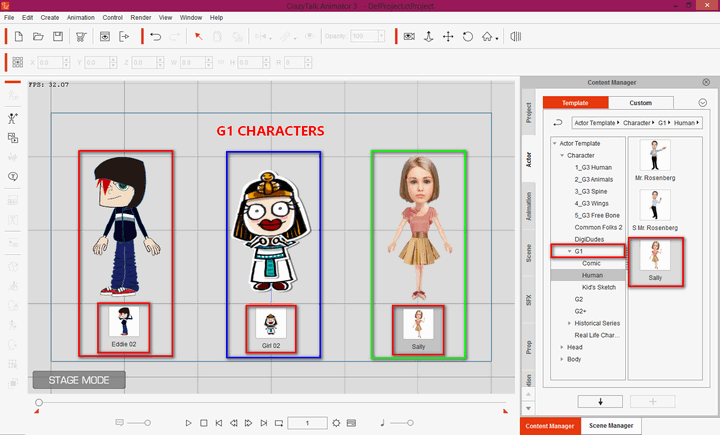
There are several kinds of characters in CrazyTalk Animator. They are; (a) G1 - which is CTA ver1 characters, (b)G2 - which is CTA ver2 characters, (c) G3 - which is CTA ver3 characters, and (d) Free Bone Characters (ver 3 also).
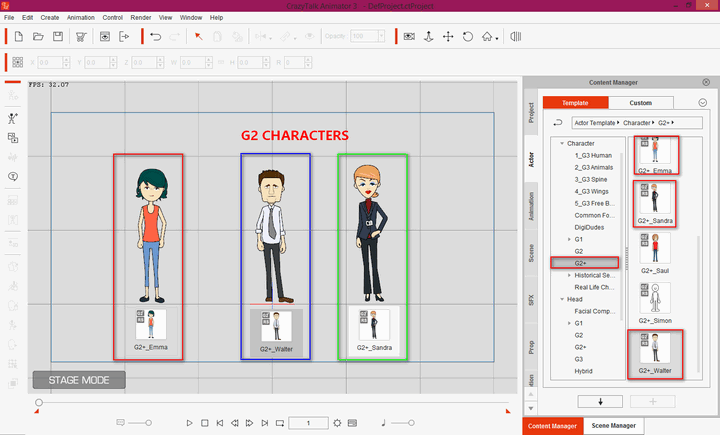
G1 characters are designed facing either front or side views as implied in relation to the direction of the characters left feet. Most of the G1 sprite-based-characters of this type that are seen in the Content Library (preset/templates) are version 2 or above. They are converted characters to suffice for G1. G1 characters are basically flat with a single view (from and side only). The perspective of the 9 other angles use this view (front/side) as reference. On the other hand, G2 characters and above have 10 angles.
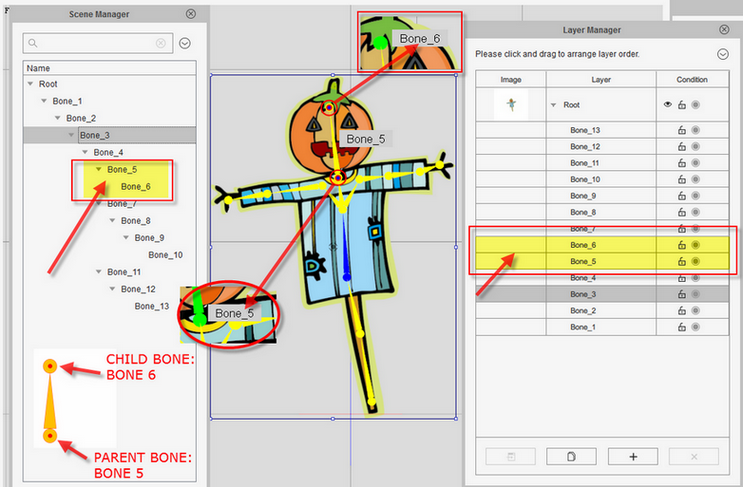
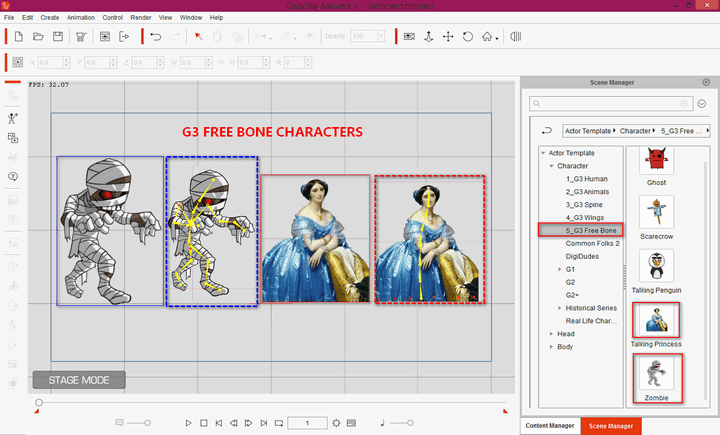
G3 characters are built with fixed regulated bone structures. This is a "bone-rig" arrangement. G3 characters are divided into G3 Humans, G3 Animals, G3 Spine and G3 Wings. In the bone-rig arrangement, let it be noted that the "Parent Bone" or base bone is the one located at the bottom side of the triangle while the "Child Bone" is at the pointed one. That triangle that you see there is actually not a bone but an "indicator" showing the direction of the bone string and the bones connected to it. Please see image below of a "Free Bone Character". Bone 5 is the "Parent Bone" and Bone 6 is the "Child Bone". The "indicator-triangle" shows that Bone 5 and Bone 6 are connected to each other.
Free Bone Characters (ver 3 also) are built with "free structures of bones". Therefore they can be human or non-human.
CTA says that basically "Free Bone Characters" do not have heads (though you can see they have there...) but you can attaches nay head as replacement for that matter there. That function is not only limited to Free Bone Characters but all characters of CTA as well as will be seen in the latter part of this review.
I will not delve on the intricacies of the CrazyTalk Animator Pro as this will be a full blown review warranting more than 20-30 pages and more time consuming at that so I will just make a demo project (for this short review) so you can see what CrazyTalk Animator Pro can do. To suffice, I will insert an tutorial video I always use.
CTA3 can bring 1D or 2D characters to life by simply adding facial animations at no particular steep effort beyond of what we may term as a newbies trial and error. Let’s make one here.
Basic Facial Animation
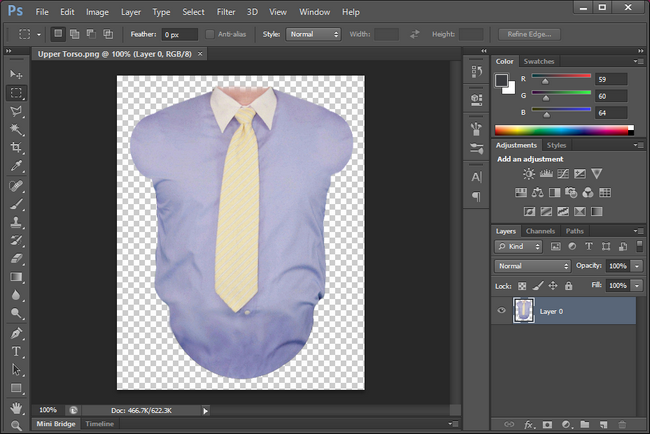
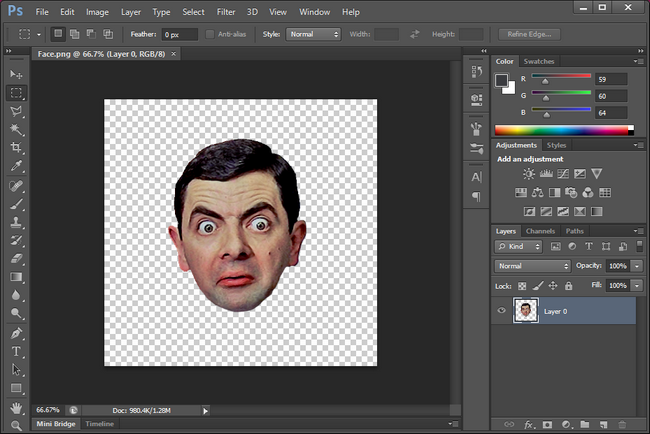
I made a screenshot image of Mr. Bean from an old movie I have and saved it as .PNG file.
Rowan Atkinson also known as "Mr. Bean" is an English actor, comedian, and screenwriter best known for his work on the sitcoms Blackadder and as mentioned Mr. Bean. I have been immersed with his movies and sitcoms way back 90's. His last successful, film was Johnny English Reborn (
Zaloguj
lub
Zarejestruj się
aby zobaczyć!
).Rowan Atkinson aka Mr. Bean - Biography
Zaloguj
lub
Zarejestruj się
aby zobaczyć!
Rowan Atkinson
Zaloguj
lub
Zarejestruj się
aby zobaczyć!
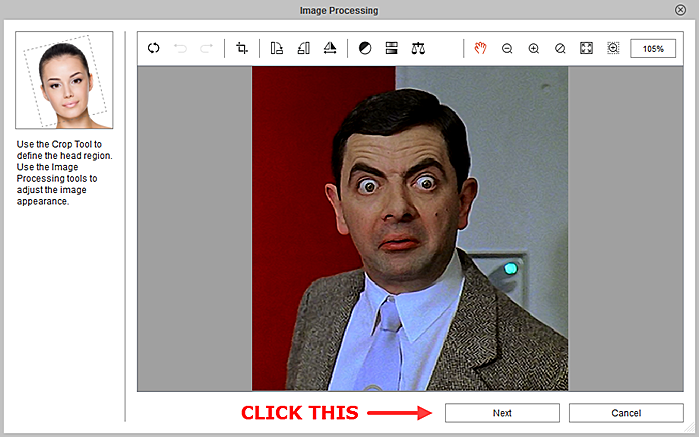
To go back to the short review, CTA3 has capabilities to crop/cut-out images. If you see the Mr. Bean image I will use, it is cropped like a mugshot with the neck and shoulders but I can cut out just the head portion in CTA3 but for this review I will use Photoshop to do that for me as I work much faster with it. Also CTA3 has integration in Photoshop and when you are in need to edit something you can just "Launch to External Image Editor".
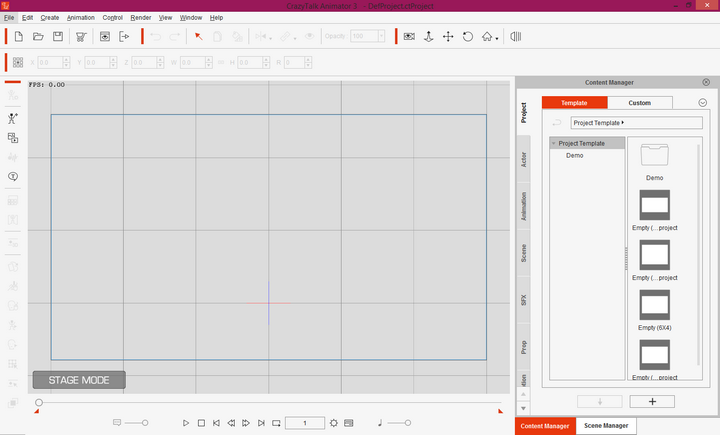
When you open CTA3 it will open in its default "Stage Mode". You can also drag an image file directly into the CTA3 interface (like Photoshop) and it will automatically bring you to the "Composer Mode". For this short demo of face animation I will go to the Menu Bar > Create G3 Free Bone Actor > Select the image of Mr. Bean. Doing so will open the image in the "Composer Mode" with the "Bone Editor" dialogue in view. Since we are not creating a bone on the face (well you can if you are imaginative) I will just close the "Bone Editor" for now. With the image selected (selection points are seen in "blue") I need to convert it to a "Morph Based Head". The Image Processing window will appear and it is there where you can crop, rotate, mirror and adjust color levels. For this part I'll just proceed to Click "Next" to go to "Auto-Fit Anchor Points window".
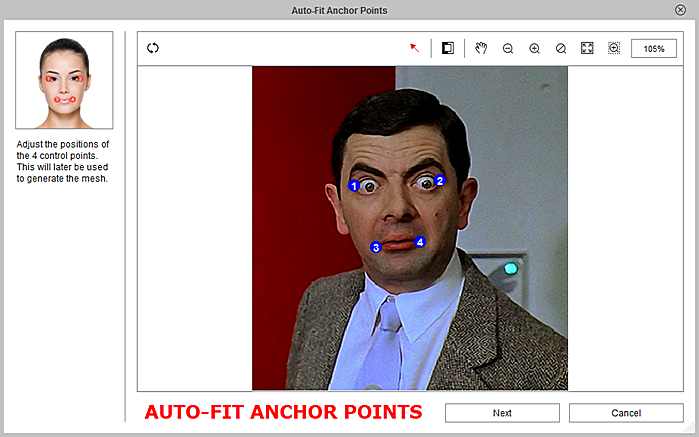
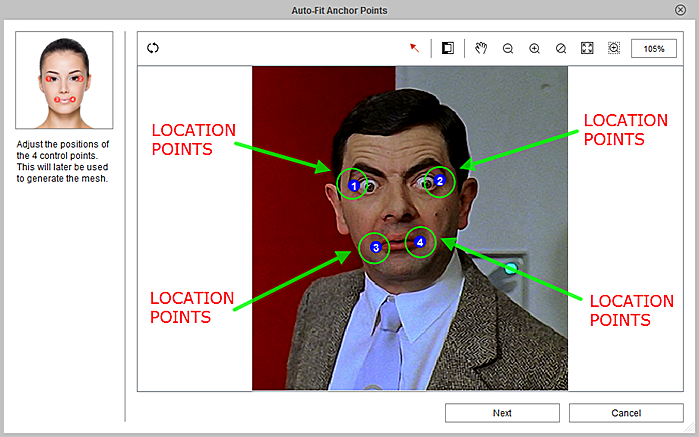
Face Fitting
In "Auto-Fit Anchor Points" window this is where you place the 4-point auto fitting which will act as the base frame to fit the face of Mr. Bean. You just have to drag the location points 1-4 to the edge of the eyes and mouth and that's it. You can zoom in the eyes/mouth so you can place it more accurately. It is imperative to adjust/place the location points as accurate as possible to get the best fit for the eyes and mouth. There is a "reset" button if you make a mistake and want to start fresh.
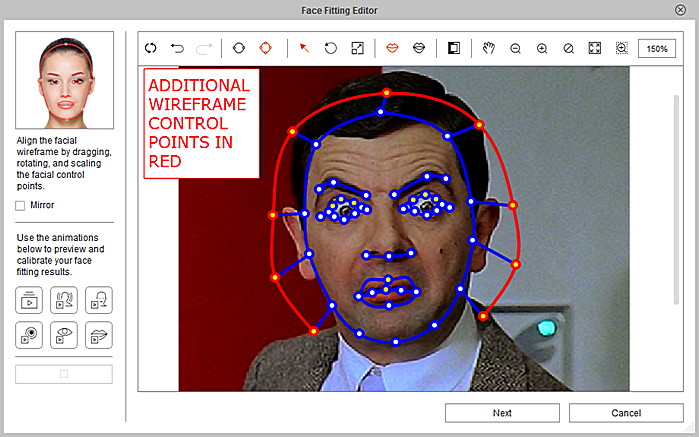
The "Face Fitting Editor" helps you to frame up the facial features of Mr. Bean's face via wireframes. Placement of the location points must be precisely placed as possible as it will affect the result. There is a zoom tool that is advisable to be used always so the precision of the drag-points are place properly. Again the reset button is there if you need to start fresh.
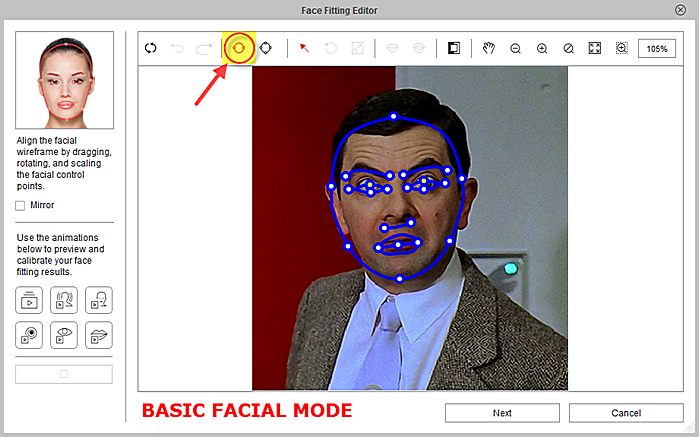
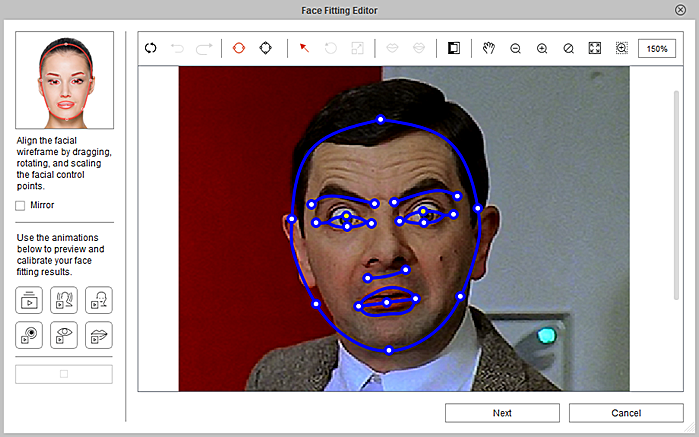
Let it be noted that the "Face Fitting Editor" has 2 facial modes: (1) Basic Facial Mode (which is by default the first that pops-up and the (2) Detail Facial Mode where there are additional points that you can drag/set so wireframe more precisely.
If you will closely look at the comparison images of Basic Facial Mode and Detail Facial Mode there are additional wireframe control points with the latter to fit Mr. Bean's face more precisely with the inclusion of the outer control points for the crown for the hair/ears alongside the additional control points for the eyes, nose, mouth, and the peripheral of the face.

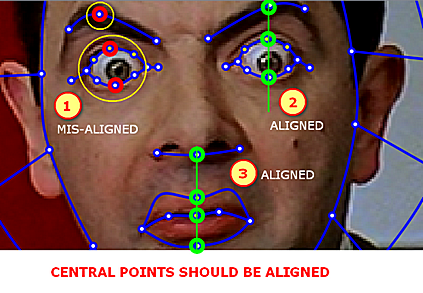
One detail that should not be overlooked is that the alignment of certain points are important. They are:
a) Middle control point of the eyebrow and the middle control points of the upper/lower eyelids.
b) Middle control point of the nose, the middle of the inner-lips and the middle control points for the upper/lower lips
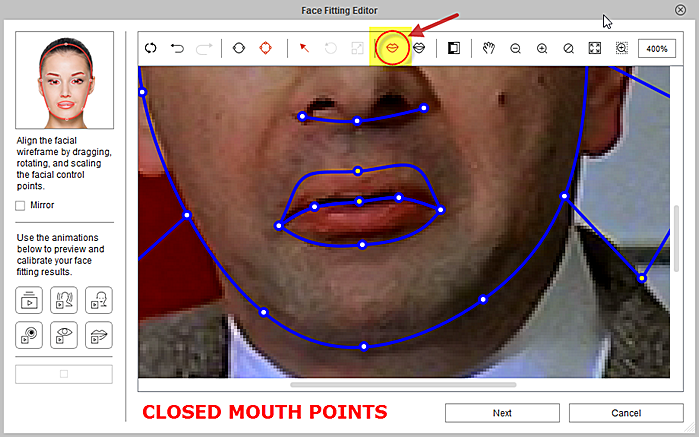
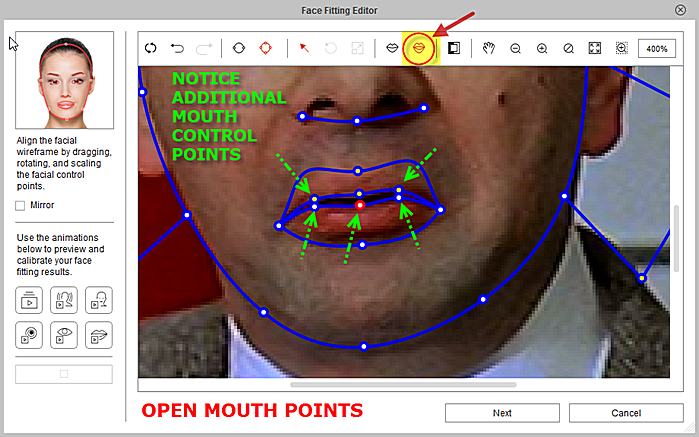
If there is an open mouth like this image (and you want to retain it) you can set it to have an open mouth by adding more wireframe points to it. The "Open Mouth" points and the "Close Mouth" points are at the top of the Face Fitting Editor menu.
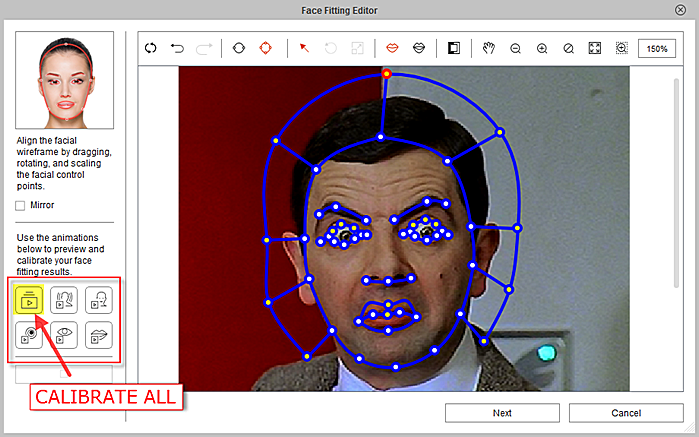
After setting all the wireframe control points as accurate as possible I have to view it so I can gauge where I am. Calibration Buttons" are provided for that matter. There is a "calibrate all" (the first of the 6 calibration buttons) that allows you to preview the end result based on what you have set.
See below.
Now we have to define the "Face Orientation" of Mr. Bean. The Face Orientation is where I will adjust the profile style of Mr. Bean and then afterwards define his face orientation.
It must be noted that the axis should fall at least at the center of the face. There 9 basic profiles to choose from there with a Strength slider which can adjust the accentuation and motion of the character. A high value accentuates more the profile and motion of the character chosen. There is a preview button so you can choose what is best for your character. As with mine, Mr. Bean I set to 1.
Please see sample animation of Mr. Bean's face below. I applied a random preset face animation of "Cry" just to make you see the end-result based on the settings I made earlier.
See below.
Better results can be obtained if the face you selected is facing front and if mouth closed and of course if the photo/image of the face has been cut-out from the rest of the other parts of the images (the background of Mr. Bean is also moving in relation to the animation done) but frankly it’s in the imagination of the user and how can he make it work out. Just wanted to show you the possibilities there. When I started this trial there was a lot of trial and error but not too much as to make you stop and pull the plug. It gets more interesting when you do it. And one thing I'll promise you there will be smiles and laughs in between checking out/applying animations to your project especially when you have recorded it and view the end result. AS mentioned earlier you noticed that I have not cut out the head of Mr. Bean here but in the next demo I will use a cut out image of Mr. Bean I did in Photoshop and attach it to a cartoon body.
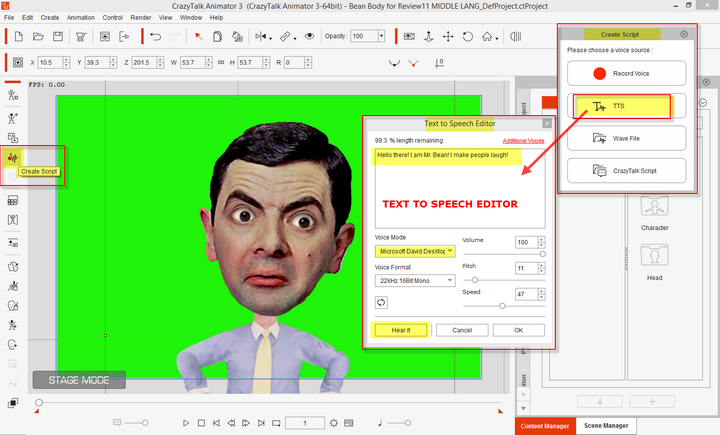
Making Mr. Bean Talk
Let it be noted that you can also you can apply a voice to Mr. Bean's head. I will not delve on this in detail but I'd just like to show you a one way to do it here. In "Stage Mode" you go to "Create Script". The "Create Script" will show you options listed below.
- Record Voice
- TTS (Text-to-Speech)
- Wave File
- CrazyTalk Script
The options are pretty self-explanatory there and the fastest way is to record your own voice or use TTS (text-to-speech --which uses Microsoft Speech Platform). If you have some application that can alter your voice like, AV Voice Changer Diamond or MorphVox or know how to tinker with a sound editor to make some spectacular voice in the likes of Samuel L. Jackson or Morgan Freeman then good for you! I don't have one so I'll use "TTS". I know all you get the picture here. Your imagination is all you need!
See image below.
Ostatnia edycja:


