
jasonX
Bardzo aktywny
- Dołączył
- 23 Październik 2015
- Posty
- 151
- Reakcje/Polubienia
- 987
CintaNotes : A short spin
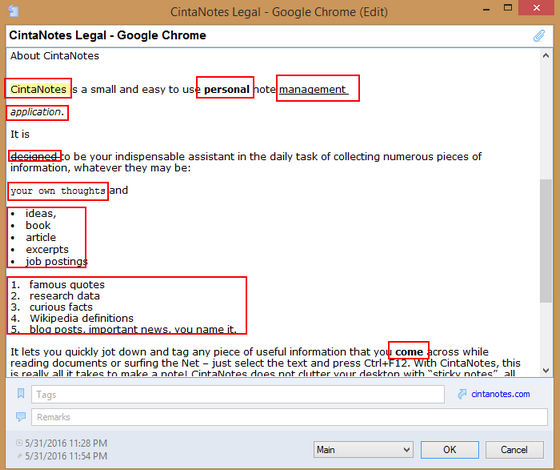
I have CintaNotes sleeping in a partition of mine and I would seldom-to-often use it from time to time then I'd go back to using PolyEdit, EditPad or WordPad for taking down notes plus FastStone Capture for images(screenshot and scrolling mouse capture I can't do without!!). I have the PRO license here with me, which I still haven't used") but until now I haven't really tinkered with CintaNotes. So this a first in a long time that I have tinkered with CintaNotes for about 2 hours while I am typing this sort of "spin".
but until now I haven't really tinkered with CintaNotes. So this a first in a long time that I have tinkered with CintaNotes for about 2 hours while I am typing this sort of "spin".
Upon first use alongside applications I often use when online, CintaNotes is very light! I almost did not notice any slowdowns and I was even using Photoshop, Word, Powerpoint, WinRAR, FastStone Image Viewer, PolyEdit Lite, EditPad, Faststone Capture alongside browsers (2) and music/music videos played in PotPlayer. CintaNotes gives you the capability to take notes either, manually, clip text from other applications or paste text from the clipboard.
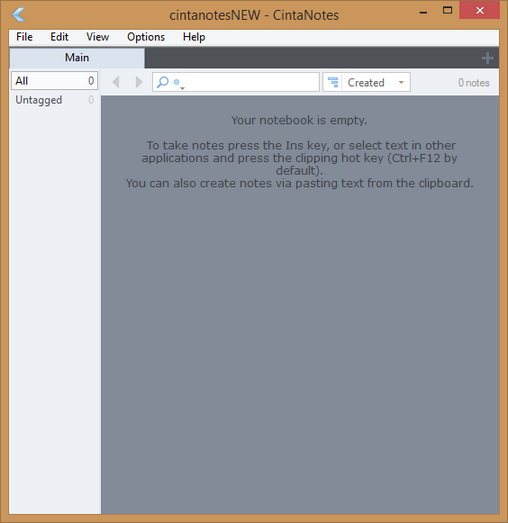
Data whatever it maybe is easy to collect and keep track of both on- and offline. When you run CintaNotes for the first time you will see this blank gui.
Settings
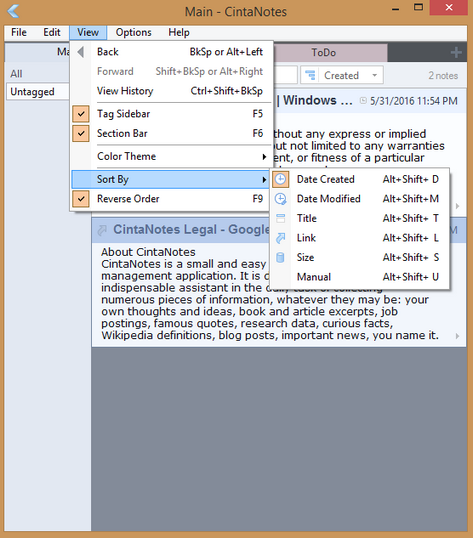
CintaNotes settings can be seen in the ‘View’ and ‘Options’ menu. The view menu deals mainly with the programs main window.
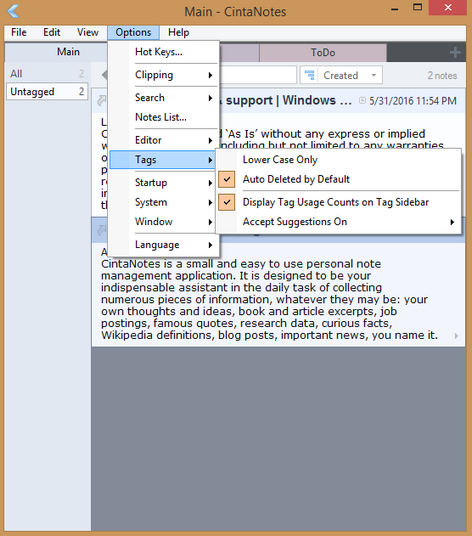
The ‘Options’ menu shows more advanced settings for Hot Keys, clipping,etc.
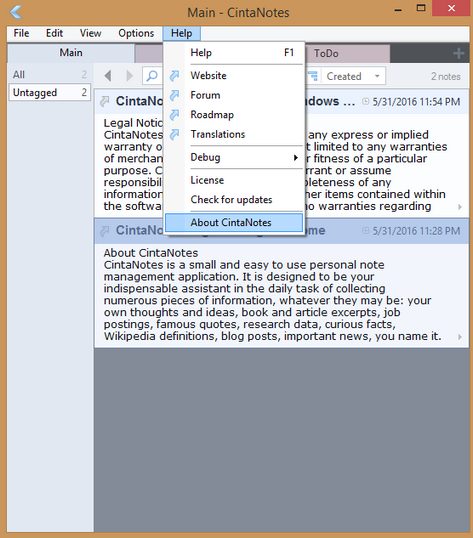
The help menu shows ways to visit Cintanotes websites(About CintaNotes), licensing, updates, etc.
Clipping text
Entering notes manually is great if you want to write down some brilliant ideas of your own, but often you will just want to store a piece of information you’ve found somewhere else. This is a case where CintaNotes really shines.
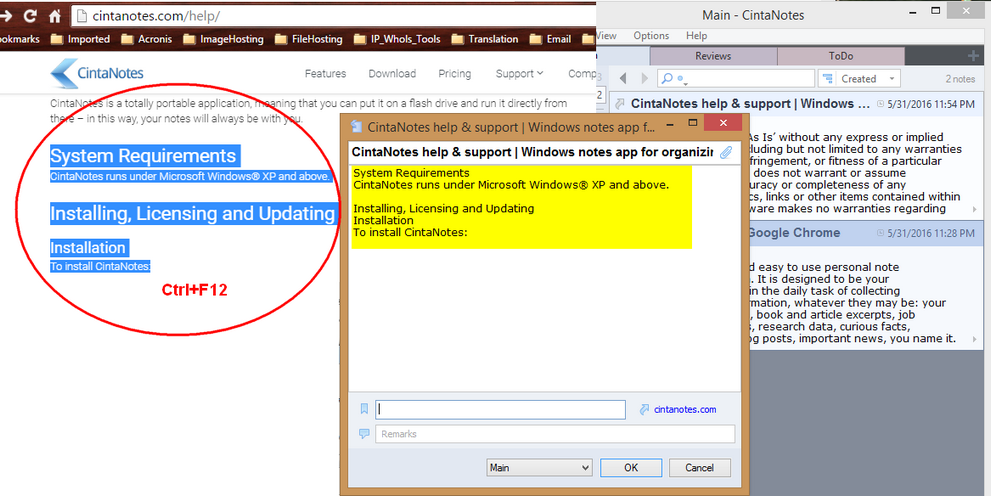
If you are a fast-typer and you need only to enter a small amount of data, you can do it manually. But most of the time the data that you want to store is from somewhere else. In CintaNotes(assuming that it is running --resides in the system tray) you have to just mark the text you want and press Ctrl+F12. The main window will pop up, showing the new note with the text you’ve just selected.
Taking notes manually
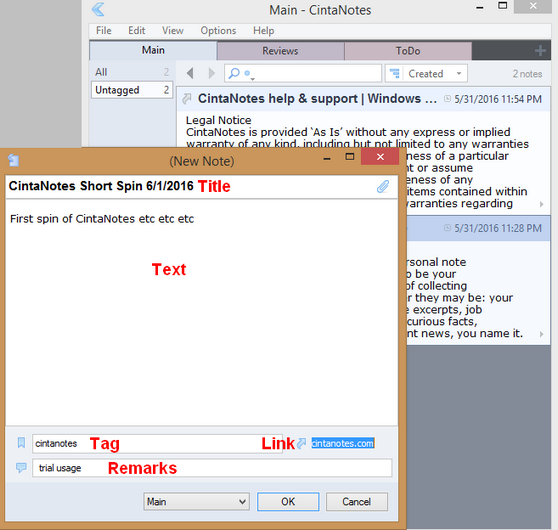
Sometimes while working an idea pops into your head and you want to write that down, say, a quote, or a draft procedure of some kind. To do this, open CintaNotes>select “New Note” command from the “Edit” menu (or just press the Ins key or Ctrl+N). A new note will be created the note editor is displayed. There you can enter a note’s title, text, tags, link and also add some additional remarks.
Pasting notes from the clipboard
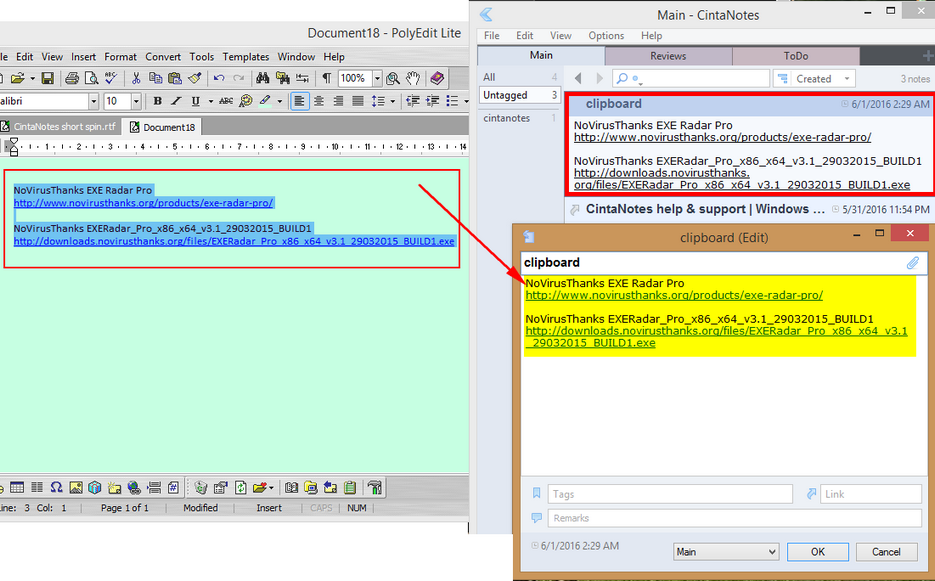
CintaNotes allows direct text pasting from the clipboard. Go to, Edit>Paste. A new note will be created with the text from the clipboard. Alternatively you can press Ctrl+V to access the Edit command.
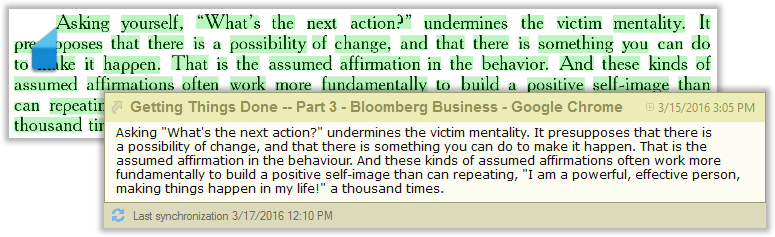
CintaNotes recommends the use of the clipping hot key (Ctrl+F12) because using that also the link to the note’s source. For example, if you clip a note from a web page, the Link field will receive the URL of this page. Select the text you want to copy, press Ctrl+F12 and automatically what you have selected will be shown. You can also set it to open in Editor.

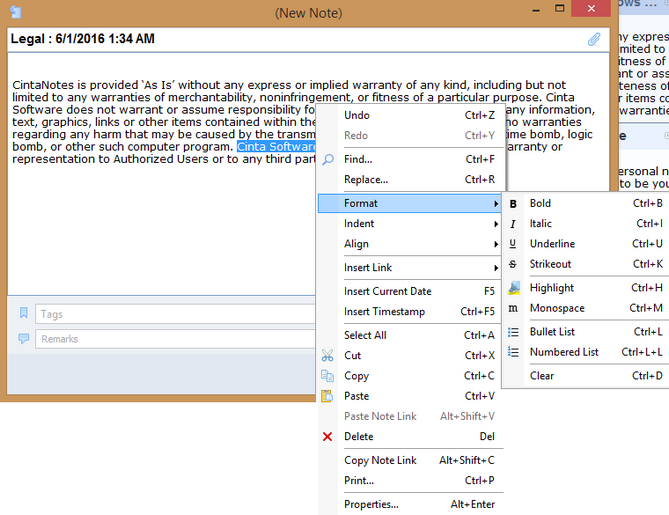
Editing and formatting notes
Notes can be edited anytime. Just double-click on any note and th editor will appear with your note. Alternatively you can highlight it and press Enter or F2. CintaNotes supports basic text formatting with the help of the Format pop up submenu. Bold, italics, underline, strikeout, monospace and highlighting are supported. Also you can make bulleted and numbered lists.
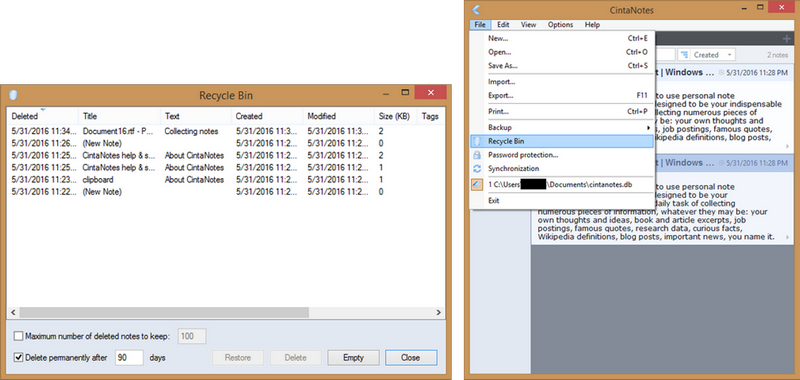
Deleting notes
Deleting notes is also straightforward – select the notes you want to delete, and press the Delete key (or select “Delete” from the “Edit” menu or the note’s context menu). By default, deleted notes go into the CintaNotes own Recycle Bin and is accessible from the File menu. But you can also delete notes permanently with the Shift+Del shortcut.
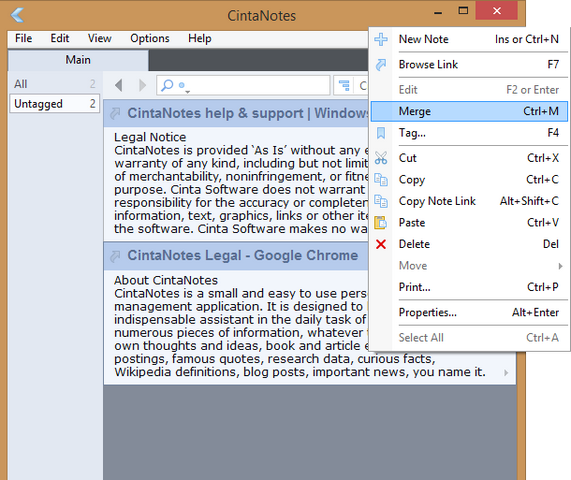
Merging notes
While working long across different applications alongside taking notes you end up getting a whole bunch of notes! CintaNotes you can merge all or selected notes together via selecting all of them and choosing the “Edit/Merge” command (or pressing Ctrl+M) or via the right-click>Merge. The selected notes will be merged into one
Taking notes on mobile devices
CintaNotes supports two kinds of synchronization via Simplenote service. To view and edit notes on your mobile devices, you need to sync them with Simplenote. Simplenote is a free cloud service for sharing and synchronizing notes. First, go to simplenote.com to create your Simplenote account.
Then open the Synchronization window and log into your Simplenote account.
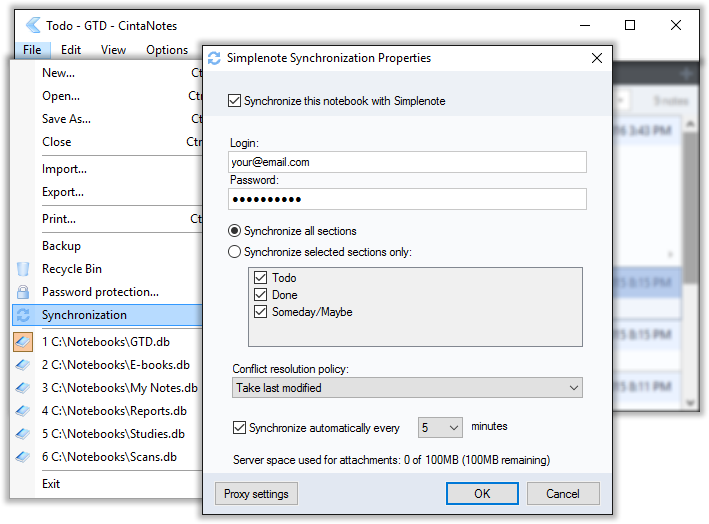
After this, your notes will be synced.

Now install and run the Simplenote app on your mobile device and connect it with your account (links to apps for each mobile platform can be found also on the Simplenote website). Each time you create a note with Simplenote on your mobile device, it will automatically be synchronized with the notes on your PC. This way, the notes you take on your phone or tablet PC will be instantly available on your PC.
Using Simplenote, you can access your notes from the web and on platforms other than Windows, such as Mac, iOS, Android and Kindle. However, since Simplenote doesn’t support file attachments, CintaNotes uses own server for syncing attached files (up to 100 Mb per user). They are encrypted with your Simplenote password, this means that no one except you will be able to decrypt them.
Note: Dropbox Synchronization is also supported. See source link below to find out how to set up Dropbox Synchronization.
Search functions
CintaNotes (by default) displays all notes which are in the notebook, organized in a list. You can enter a search query to limit the display to the notes satisfying the query. To begin entering the search string, just start typing in the main CintaNotes window. The focus will go to the search box, and the note list will be updated as you type.
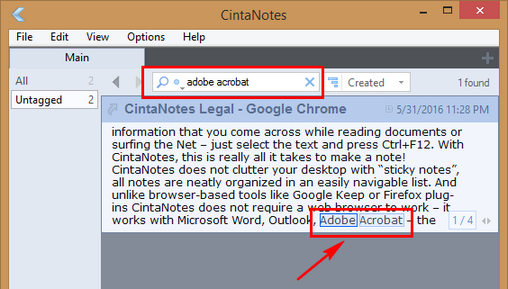
CintaNotes highlights parts of notes which matched your search. You can use the F3 and Shift+F3 keys on the focused note’s text preview to navigate forward and backward through the highlighted matches (the same keys also work in the note editor window for searching selected text).
Search strings are not case-sensitive. To reset the search filter and go back to the full list, click the ‘X’ (close) button inside of the search box, or press Esc. Adding a new note will reset the search filter as well.
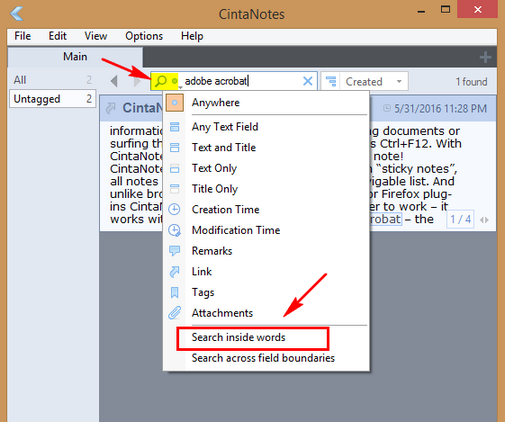
By default, CintaNotes searches only from the word boundaries. This means that e.g. when you search for nation, notes containing the word “international” won’t be found. If you want to search also inside of words, you need to activate the “Search inside words” option by clicking on the magnifying glass icon (or simply right-clicking) in the search box, and selecting the “Search inside words” item from the drop-down menu.
Notebooks
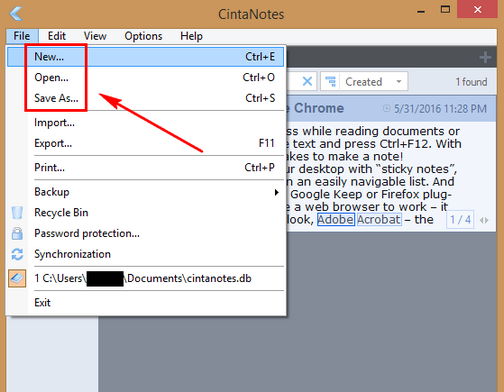
CintaNotes stores all the notes you take in a notebook file. On first run, CintaNotes creates a notebook file called “cintanotes.db” in the install location (or the location of the executable if using the portable version). Create new notebooks via the File>New command, and open existing notebooks using the File>Open command and save copies of Notebooks using the File> Save As command. The PRO versions allows for Multiple notebooks.
Sections
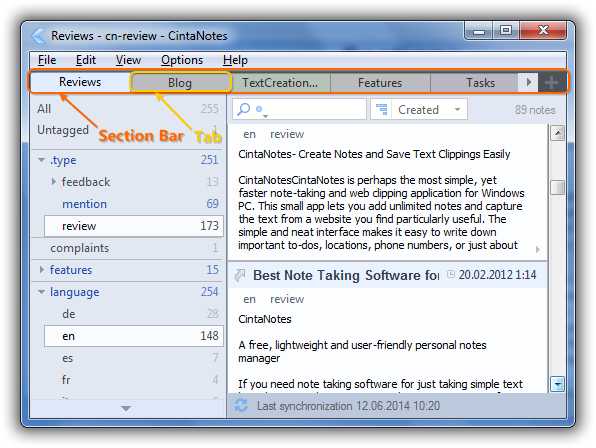
Sections represent a disjointed set of notes, that is, notes which you’d like to keep separate, but still in the same notebook. Sections are represented as tabs on the Section Bar, which is located at the top right below the main menu and at the top of the main window. It helps you keep notes on different topics apart from each other within one notebook.
Sections in a notebook are represented as tabs on the Section Bar, which is located at the top right below the main menu. When CintaNotes creates a new notebook, it also creates a section called “Main”. Right-clicking on a tab in the Section bar brings up a context menu which contains all section-related commands.
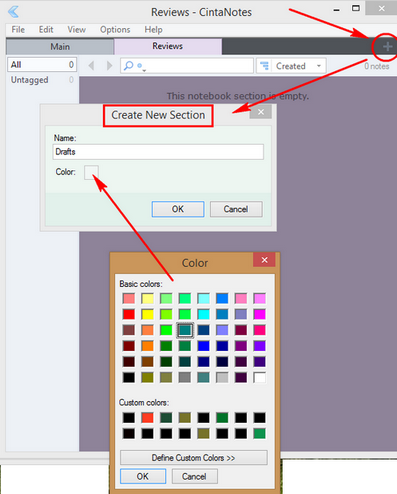
To create a New Section, right-click the Section bar>New Section or click the "+" sign at the right-most corner of the Section bar. In the dialog box that comes up you need to specify the name of the new section. You can set the color as you like via the color tab. Note that the final tab color can differ from what you’ve picked: to ensure comfortable brightness and contrast levels, only the hue of the selected color is used.
To rename a section, or to change its properties, use the Properties command in the section tab’s context menu.
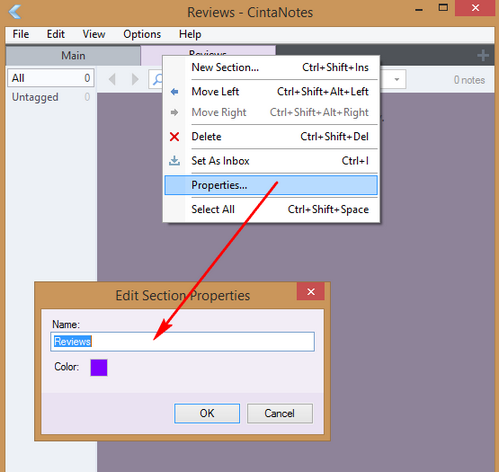
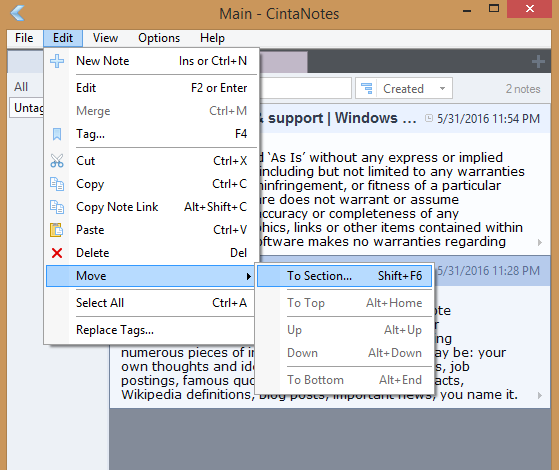
Deleting a section is possible through the Delete command of the same menu, or via pressing Ctrl+Shift+Del. Mind that all notes the section contains will be deleted and unrecoverable. If you want to delete the section but keep the notes, you should first move the notes to another section via selecting them and executing the Edit/Move/To Section command (Shift+F6).
Tags
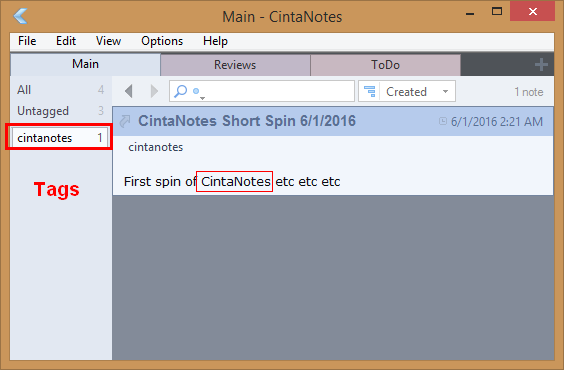
Tags are keywords used to describe and group your notes. They help you quickly find any piece of information you save, even in a long list. The main difference of tags from sections is that a note can belong to only one section, but have many tags. While editing a note, you can specify any text in the note’s “Tags” field. Later you can use part of this text to quickly filter out notes which don’t contain it in their “Tags” field, thus greatly narrowing down your search.
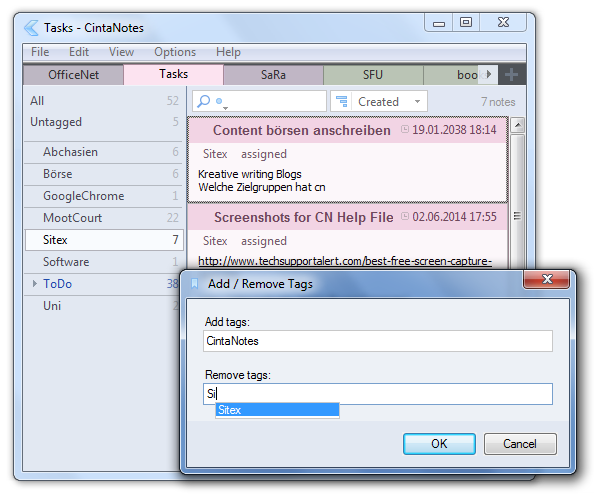
For example, you might decide to tag notes as a ToDo list with a “ToDo” tag. So every time you take such a note, you put “ToDo” into the “Tags” field. After that this tag will appear on the Tag Sidebar (see the screenshot below), so you will be able to highlight it, and CintaNotes will display just your ToDo notes. Alternatively, you can turn on Tag Search (see “Finding notes” section) and type “ToDo” as your search string.
If you want to associate two or more tags with a note, just put them all into the “Tags” separated by spaces (comma and semicolon can also be used but will be automatically converted to spaces).
It is possible to tag several notes at once: just select them and press F4 (or select the Tag… command from the context menu).
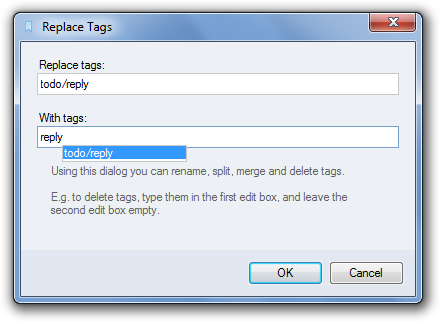
The Edit/Replace Tags command allows tag renaming, splitting, merging and deleting. Generally, each tag specified in the first edit box is replaced with all tags from the second edit box.
Securing notes
CintaNotes gives you full control over access to all your notes. CintaNotes doesn’t require that you use any cloud drives to store notes. Your notes can reside only on your device, and you can work with them regardless of your Internet connection. The PRO version allows for password protection of notebooks.
Notebook backup
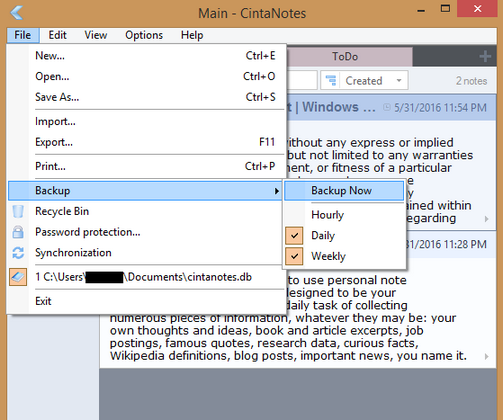
Data loss in any form should be prevented always. With CintaNotes and the minimize the risk of any data loss, it automatically creates backup copies of your notebooks. By default, CintaNotes creates daily and weekly backup copies. Normally, this is enough for working safely, however, you can set CintaNotes to create a backup copy every hour. In case of emergency, you can also create a manual backup with the “Backup Now” command.

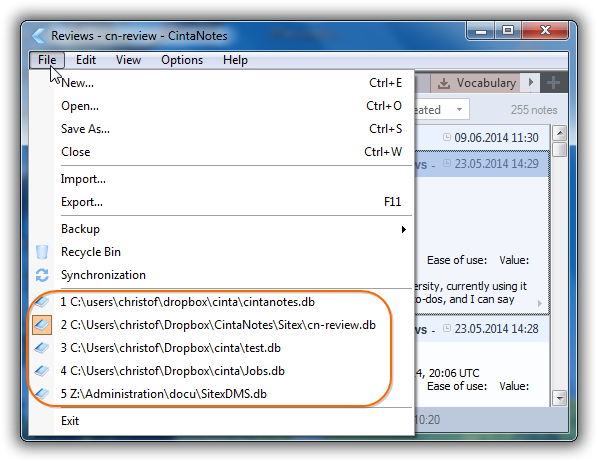
Multiple Notebooks(PRO only)
Everytime you create a new notebook file or open an existing notebook file, that notebook file will be added to the CintaNotes File menu. To switch between notebooks is then simply a matter of selecting the notebook file from the File menu. The notebooks are all numbered, allowing you to use keyboard shortcuts, so pressing Alt+F2 will change to the second notebook in the list. A notebook can be removed from the list by opening that notebook and selecting the File >Close.
Password Protection(PRO only)
CintaNotes protects your sensitive data and encrypt notebooks using the industry acclaimed AES-256 algorithm. When a password is applied the notebook will always remain encrypted on disk. It will only be decrypted into memory when you enter the password. Note that password protection only currently works with whole notebooks only.
To set the password for the current notebook, select the File / Password Protection command in the main menu. The following window will appear:
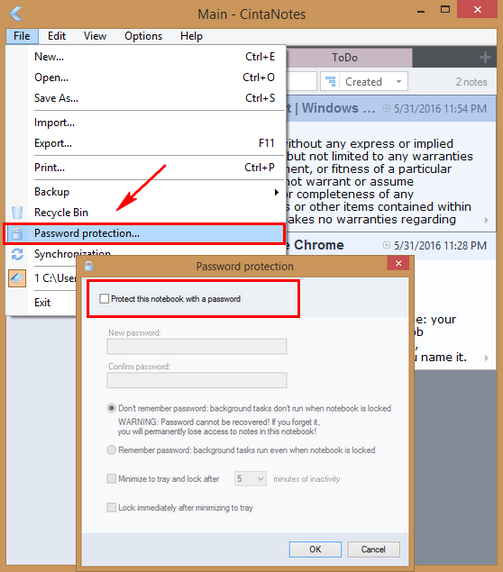
Activate the Protect this notebook with a password checkbox and enter the desired password into the New password and Confirm password fields (you need to enter the password twice to minimize the risk of a typo). The controls below allow to configure password options and we’ll examine them in a later section. Press OK and CintaNotes will report progress as it is encrypting the notebook. After the password is set, any access to the notebook when it is locked (more on this in a later section) will require entering the password like this:
To change the password after it has been set, go to the same File / Password Protection window and click on the “Change Password” button.
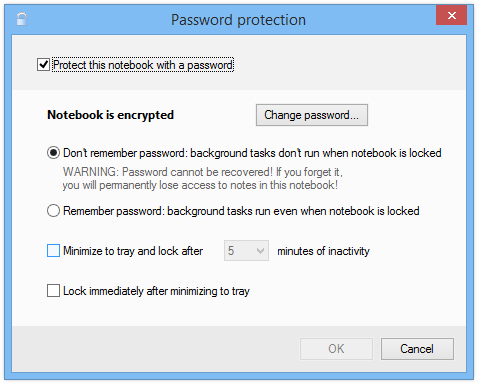
The panel with the “New password” and “Confirm password” edit fields will appear. Enter the new password into them, then click on OK and re-enter the old password. After that the notebook will be re-encrypted with the new password.
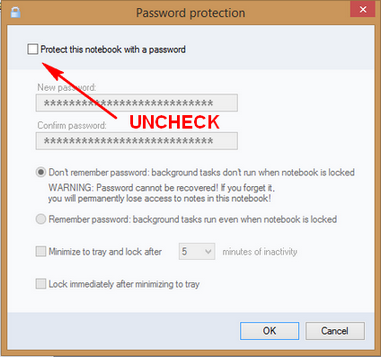
To remove the password and decrypt the current notebook, simply uncheck the “Protect this notebook with a password” checkbox in the “Password Protection” window. After clicking OK and entering the password for the last time, the notebook will be decrypted.
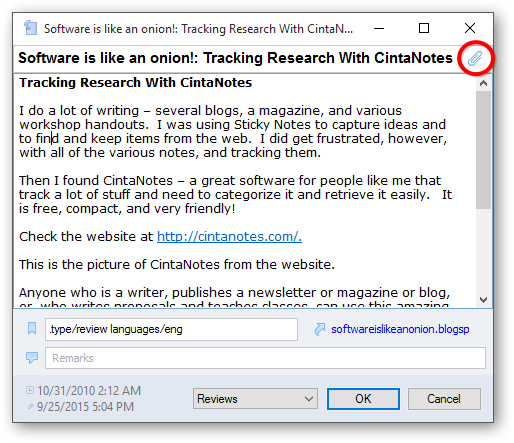
Attaching files to notes(PRO only)
CintaNotes allows you to attach documents, e-books, audios, videos and other files to your notes. Just open any note, click on the paperclip button at the top right corner of the editor, and select the files to be attached. To add a file to your note, open the note in the editor and click the paper clip button at the top-right corner to browse for files (or press F12).
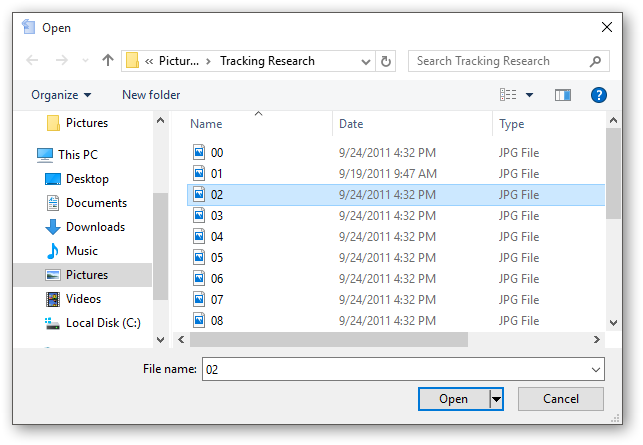
Pick the file you want to attach and click Open to add it to your note. Selecting and attaching multiple files at once is also supported.
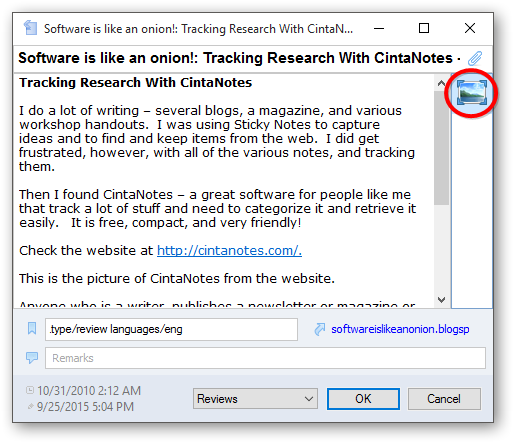
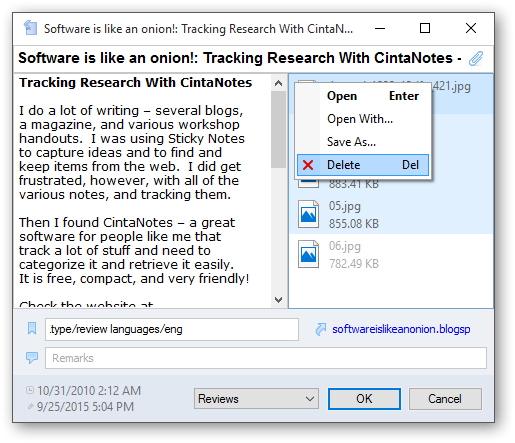
To view or edit an attached file, you need to open the note it belongs to, and double click the necessary attachment (or select it and press Enter). The same can be done by right clicking on the file and choosing Open from the pop-up menu.
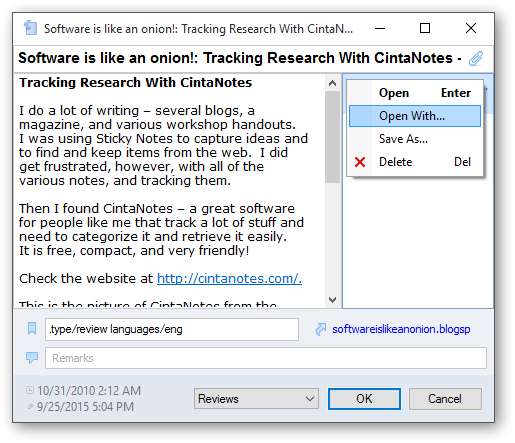
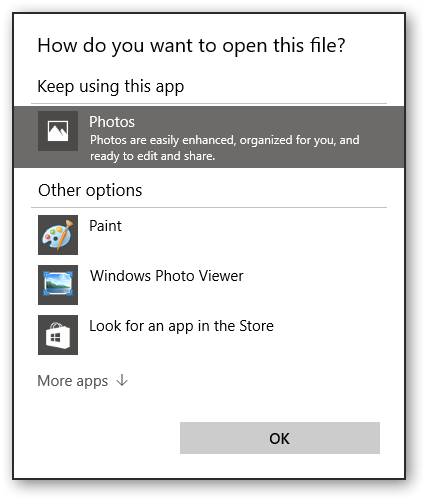
This will open the file in the default application for this file type, where you can view and edit it. If you need to open the file with another application, right click on the file and choose the Open With… command from the context menu of the file.
It is important to understand that since attachments are stored in the notebook file, CintaNotes needs to extract them to disk before opening in external applications. So when you access an attached file for viewing or editing, CintaNotes saves it to the Temp folder (normally the default path will be C:\Users\UserName\AppData\Local\Temp), from where it is opened.
To remove an attachment from a note, right click on the file and choose Delete from the context menu (or simply hit Del on the keyboard).

You can select and delete multiple attachments at once.
To remove all attachments, focus the attachment list and press Ctrl+A, and then press Delete.
Pasting Notes to Other Applications(PRO only)
CintaNotes allows you to extract the content of a note to another application running on your Windows PC. Pressing Ctrl+Enter or the middle mouse button will paste the currently selected note (or notes) into the Windows application that was running immediately prior to opening CintaNotes.
This feature is a great time saver when writing a report for example. You can be writing in Word, then switch to CintaNotes, select a note which you want to quote, hit Ctrl+Enter and the note is there in your document and you can continue writing.
Pressing Ctrl+Shift+Enter (or Shift+Middle click) inserts all note fields and not only note text.
Licensing
CintaNotes (by default) is installed under the terms of the Basic (Free) License. But some advanced features are initially locked, and only get unlocked upon upgrading to the PRO license. These (PRO license) features include:
- Simplenote synchronization
- Password protection
- File Attachments
- Multiple notebooks support
- More than 3 tabbed sections
- Linking notes with each other
- Tag hierarchy and expandable tag tree
- Exporting notes to HTML format
- Pasting notes into other applications
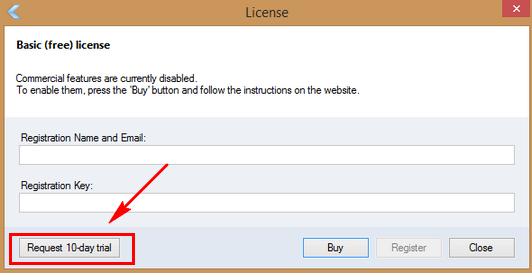
Free users can request a 10 day trial key to try out the PRO features without buying the license. Just go to Help>License and click on the “Request 10-day trial” button and you will be redirected to our website for completing a simple request form. Shortly after submitting this form you will receive the trial key delivered to your email.
You will receive your registration key by email (usually takes several minutes, but in extremely rare cases can take up to 12 hours). You can enter the registration details into the Help/License window in one of three ways:
Option 1: Select the whole purchase confirmation email text, and clip it using the configured clipping hot key (Ctrl+F12 by default) – this is the recommended approach;
Option 2: Copy the email content to clipboard and then open the License window;
Option 3: Manually enter the registration details into the License window.
The regular PRO license is good for 1 year upon installation with free updates and support for the whole year. The regular PRO license continues to be valid after 1 year, but it is only valid for the versions released before this date.Updates/support are available upon renewal of your regular PRO license. The lifetime PRO license is as the word implies, carries updates and support for a lifetime. It is permanently valid for all past and future CintaNotes versions and doesn't require renewal.
So as mentioned,
CintaNotes was so light I almost did not notice any slowdowns and I was even using Photoshop, Word, Powerpoint, WinRAR, FastStone Image Viewer, PolyEdit Lite, EditPad, Faststone Capture alongside browsers (2) and music/music videos played in PotPlayer not to mention my security apps all running (Emsisoft, NVT_Exe Radar, MBAE, MBAM Premium alongside Process Hacker). Using it seems more than just a simple note taking application. I mean I use EditPad or PolyEdit Lite for note-taking (most often) but I manually have to do it all. With the Ctrl+F12 you get all say, from the browser, all the text that I need and the links/source address as well. That clipping hot-key is really great! Search is pretty much good (searches only from the word boundaries) and can search texts that you want fast. But I seem to see that unlike PolyEdit it does not support images and cannot format text color. It does support background color formatting. Backup feature is great! Synch function is fine by me (simple synch is enough for me) but some power users may find it lacking because it only supports Simplenote and Dropbox. Would be nice if they have image support like WordPad and PolyEdit (because for me while I work online I also get the images I need as of the moment with FastStone Capture) but come to think of it CintaNotes is a text-capture based "personal note management application tool" so maybe I am pushing it. Hmm..no Mac version though.
The PRO version will definitely add some more tools and ease of use for the power user. For the simple note taker the free version is more than enough. I would like to state that the "Help and Learning" section of the home page was really helpful as it guided me toward my spin --read and try it out. For the first time user the link is very helpful to them. All in all a CintaNotes is a great applicaion for text-capture based note taking with added bonuses!
I have CintaNotes sleeping in a partition of mine and I would seldom-to-often use it from time to time then I'd go back to using PolyEdit, EditPad or WordPad for taking down notes plus FastStone Capture for images(screenshot and scrolling mouse capture I can't do without!!). I have the PRO license here with me, which I still haven't used
but until now I haven't really tinkered with CintaNotes. So this a first in a long time that I have tinkered with CintaNotes for about 2 hours while I am typing this sort of "spin". Upon first use alongside applications I often use when online, CintaNotes is very light! I almost did not notice any slowdowns and I was even using Photoshop, Word, Powerpoint, WinRAR, FastStone Image Viewer, PolyEdit Lite, EditPad, Faststone Capture alongside browsers (2) and music/music videos played in PotPlayer. CintaNotes gives you the capability to take notes either, manually, clip text from other applications or paste text from the clipboard.
Data whatever it maybe is easy to collect and keep track of both on- and offline. When you run CintaNotes for the first time you will see this blank gui.
Settings
CintaNotes settings can be seen in the ‘View’ and ‘Options’ menu. The view menu deals mainly with the programs main window.
The ‘Options’ menu shows more advanced settings for Hot Keys, clipping,etc.
The help menu shows ways to visit Cintanotes websites(About CintaNotes), licensing, updates, etc.
Clipping text
Entering notes manually is great if you want to write down some brilliant ideas of your own, but often you will just want to store a piece of information you’ve found somewhere else. This is a case where CintaNotes really shines.
If you are a fast-typer and you need only to enter a small amount of data, you can do it manually. But most of the time the data that you want to store is from somewhere else. In CintaNotes(assuming that it is running --resides in the system tray) you have to just mark the text you want and press Ctrl+F12. The main window will pop up, showing the new note with the text you’ve just selected.
Taking notes manually
Sometimes while working an idea pops into your head and you want to write that down, say, a quote, or a draft procedure of some kind. To do this, open CintaNotes>select “New Note” command from the “Edit” menu (or just press the Ins key or Ctrl+N). A new note will be created the note editor is displayed. There you can enter a note’s title, text, tags, link and also add some additional remarks.
Pasting notes from the clipboard
CintaNotes allows direct text pasting from the clipboard. Go to, Edit>Paste. A new note will be created with the text from the clipboard. Alternatively you can press Ctrl+V to access the Edit command.
CintaNotes recommends the use of the clipping hot key (Ctrl+F12) because using that also the link to the note’s source. For example, if you clip a note from a web page, the Link field will receive the URL of this page. Select the text you want to copy, press Ctrl+F12 and automatically what you have selected will be shown. You can also set it to open in Editor.
Editing and formatting notes
Notes can be edited anytime. Just double-click on any note and th editor will appear with your note. Alternatively you can highlight it and press Enter or F2. CintaNotes supports basic text formatting with the help of the Format pop up submenu. Bold, italics, underline, strikeout, monospace and highlighting are supported. Also you can make bulleted and numbered lists.
Deleting notes
Deleting notes is also straightforward – select the notes you want to delete, and press the Delete key (or select “Delete” from the “Edit” menu or the note’s context menu). By default, deleted notes go into the CintaNotes own Recycle Bin and is accessible from the File menu. But you can also delete notes permanently with the Shift+Del shortcut.
Merging notes
While working long across different applications alongside taking notes you end up getting a whole bunch of notes! CintaNotes you can merge all or selected notes together via selecting all of them and choosing the “Edit/Merge” command (or pressing Ctrl+M) or via the right-click>Merge. The selected notes will be merged into one
Taking notes on mobile devices
CintaNotes supports two kinds of synchronization via Simplenote service. To view and edit notes on your mobile devices, you need to sync them with Simplenote. Simplenote is a free cloud service for sharing and synchronizing notes. First, go to simplenote.com to create your Simplenote account.
Then open the Synchronization window and log into your Simplenote account.
After this, your notes will be synced.
Now install and run the Simplenote app on your mobile device and connect it with your account (links to apps for each mobile platform can be found also on the Simplenote website). Each time you create a note with Simplenote on your mobile device, it will automatically be synchronized with the notes on your PC. This way, the notes you take on your phone or tablet PC will be instantly available on your PC.
Using Simplenote, you can access your notes from the web and on platforms other than Windows, such as Mac, iOS, Android and Kindle. However, since Simplenote doesn’t support file attachments, CintaNotes uses own server for syncing attached files (up to 100 Mb per user). They are encrypted with your Simplenote password, this means that no one except you will be able to decrypt them.
Note: Dropbox Synchronization is also supported. See source link below to find out how to set up Dropbox Synchronization.
Search functions
CintaNotes (by default) displays all notes which are in the notebook, organized in a list. You can enter a search query to limit the display to the notes satisfying the query. To begin entering the search string, just start typing in the main CintaNotes window. The focus will go to the search box, and the note list will be updated as you type.
CintaNotes highlights parts of notes which matched your search. You can use the F3 and Shift+F3 keys on the focused note’s text preview to navigate forward and backward through the highlighted matches (the same keys also work in the note editor window for searching selected text).
Search strings are not case-sensitive. To reset the search filter and go back to the full list, click the ‘X’ (close) button inside of the search box, or press Esc. Adding a new note will reset the search filter as well.
By default, CintaNotes searches only from the word boundaries. This means that e.g. when you search for nation, notes containing the word “international” won’t be found. If you want to search also inside of words, you need to activate the “Search inside words” option by clicking on the magnifying glass icon (or simply right-clicking) in the search box, and selecting the “Search inside words” item from the drop-down menu.
Notebooks
CintaNotes stores all the notes you take in a notebook file. On first run, CintaNotes creates a notebook file called “cintanotes.db” in the install location (or the location of the executable if using the portable version). Create new notebooks via the File>New command, and open existing notebooks using the File>Open command and save copies of Notebooks using the File> Save As command. The PRO versions allows for Multiple notebooks.
Sections
Sections represent a disjointed set of notes, that is, notes which you’d like to keep separate, but still in the same notebook. Sections are represented as tabs on the Section Bar, which is located at the top right below the main menu and at the top of the main window. It helps you keep notes on different topics apart from each other within one notebook.
Sections in a notebook are represented as tabs on the Section Bar, which is located at the top right below the main menu. When CintaNotes creates a new notebook, it also creates a section called “Main”. Right-clicking on a tab in the Section bar brings up a context menu which contains all section-related commands.
To create a New Section, right-click the Section bar>New Section or click the "+" sign at the right-most corner of the Section bar. In the dialog box that comes up you need to specify the name of the new section. You can set the color as you like via the color tab. Note that the final tab color can differ from what you’ve picked: to ensure comfortable brightness and contrast levels, only the hue of the selected color is used.
To rename a section, or to change its properties, use the Properties command in the section tab’s context menu.
Deleting a section is possible through the Delete command of the same menu, or via pressing Ctrl+Shift+Del. Mind that all notes the section contains will be deleted and unrecoverable. If you want to delete the section but keep the notes, you should first move the notes to another section via selecting them and executing the Edit/Move/To Section command (Shift+F6).
Tags
Tags are keywords used to describe and group your notes. They help you quickly find any piece of information you save, even in a long list. The main difference of tags from sections is that a note can belong to only one section, but have many tags. While editing a note, you can specify any text in the note’s “Tags” field. Later you can use part of this text to quickly filter out notes which don’t contain it in their “Tags” field, thus greatly narrowing down your search.
For example, you might decide to tag notes as a ToDo list with a “ToDo” tag. So every time you take such a note, you put “ToDo” into the “Tags” field. After that this tag will appear on the Tag Sidebar (see the screenshot below), so you will be able to highlight it, and CintaNotes will display just your ToDo notes. Alternatively, you can turn on Tag Search (see “Finding notes” section) and type “ToDo” as your search string.
If you want to associate two or more tags with a note, just put them all into the “Tags” separated by spaces (comma and semicolon can also be used but will be automatically converted to spaces).
It is possible to tag several notes at once: just select them and press F4 (or select the Tag… command from the context menu).
The Edit/Replace Tags command allows tag renaming, splitting, merging and deleting. Generally, each tag specified in the first edit box is replaced with all tags from the second edit box.
Securing notes
CintaNotes gives you full control over access to all your notes. CintaNotes doesn’t require that you use any cloud drives to store notes. Your notes can reside only on your device, and you can work with them regardless of your Internet connection. The PRO version allows for password protection of notebooks.
Notebook backup
Data loss in any form should be prevented always. With CintaNotes and the minimize the risk of any data loss, it automatically creates backup copies of your notebooks. By default, CintaNotes creates daily and weekly backup copies. Normally, this is enough for working safely, however, you can set CintaNotes to create a backup copy every hour. In case of emergency, you can also create a manual backup with the “Backup Now” command.
Multiple Notebooks(PRO only)
Everytime you create a new notebook file or open an existing notebook file, that notebook file will be added to the CintaNotes File menu. To switch between notebooks is then simply a matter of selecting the notebook file from the File menu. The notebooks are all numbered, allowing you to use keyboard shortcuts, so pressing Alt+F2 will change to the second notebook in the list. A notebook can be removed from the list by opening that notebook and selecting the File >Close.
Password Protection(PRO only)
CintaNotes protects your sensitive data and encrypt notebooks using the industry acclaimed AES-256 algorithm. When a password is applied the notebook will always remain encrypted on disk. It will only be decrypted into memory when you enter the password. Note that password protection only currently works with whole notebooks only.
To set the password for the current notebook, select the File / Password Protection command in the main menu. The following window will appear:
Activate the Protect this notebook with a password checkbox and enter the desired password into the New password and Confirm password fields (you need to enter the password twice to minimize the risk of a typo). The controls below allow to configure password options and we’ll examine them in a later section. Press OK and CintaNotes will report progress as it is encrypting the notebook. After the password is set, any access to the notebook when it is locked (more on this in a later section) will require entering the password like this:
To change the password after it has been set, go to the same File / Password Protection window and click on the “Change Password” button.
The panel with the “New password” and “Confirm password” edit fields will appear. Enter the new password into them, then click on OK and re-enter the old password. After that the notebook will be re-encrypted with the new password.
To remove the password and decrypt the current notebook, simply uncheck the “Protect this notebook with a password” checkbox in the “Password Protection” window. After clicking OK and entering the password for the last time, the notebook will be decrypted.
Attaching files to notes(PRO only)
CintaNotes allows you to attach documents, e-books, audios, videos and other files to your notes. Just open any note, click on the paperclip button at the top right corner of the editor, and select the files to be attached. To add a file to your note, open the note in the editor and click the paper clip button at the top-right corner to browse for files (or press F12).
Pick the file you want to attach and click Open to add it to your note. Selecting and attaching multiple files at once is also supported.
To view or edit an attached file, you need to open the note it belongs to, and double click the necessary attachment (or select it and press Enter). The same can be done by right clicking on the file and choosing Open from the pop-up menu.
This will open the file in the default application for this file type, where you can view and edit it. If you need to open the file with another application, right click on the file and choose the Open With… command from the context menu of the file.
It is important to understand that since attachments are stored in the notebook file, CintaNotes needs to extract them to disk before opening in external applications. So when you access an attached file for viewing or editing, CintaNotes saves it to the Temp folder (normally the default path will be C:\Users\UserName\AppData\Local\Temp), from where it is opened.
To remove an attachment from a note, right click on the file and choose Delete from the context menu (or simply hit Del on the keyboard).
You can select and delete multiple attachments at once.
To remove all attachments, focus the attachment list and press Ctrl+A, and then press Delete.
Pasting Notes to Other Applications(PRO only)
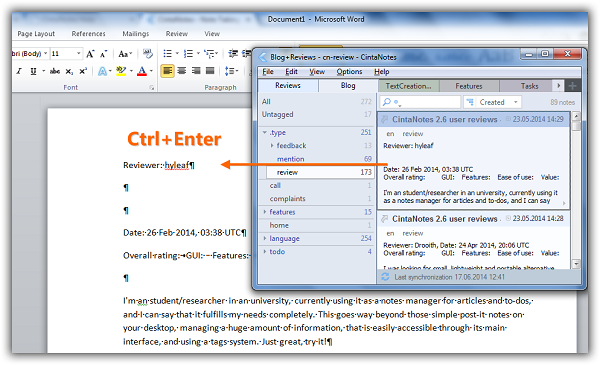
CintaNotes allows you to extract the content of a note to another application running on your Windows PC. Pressing Ctrl+Enter or the middle mouse button will paste the currently selected note (or notes) into the Windows application that was running immediately prior to opening CintaNotes.
This feature is a great time saver when writing a report for example. You can be writing in Word, then switch to CintaNotes, select a note which you want to quote, hit Ctrl+Enter and the note is there in your document and you can continue writing.
Pressing Ctrl+Shift+Enter (or Shift+Middle click) inserts all note fields and not only note text.
Licensing
CintaNotes (by default) is installed under the terms of the Basic (Free) License. But some advanced features are initially locked, and only get unlocked upon upgrading to the PRO license. These (PRO license) features include:
- Simplenote synchronization
- Password protection
- File Attachments
- Multiple notebooks support
- More than 3 tabbed sections
- Linking notes with each other
- Tag hierarchy and expandable tag tree
- Exporting notes to HTML format
- Pasting notes into other applications
Free users can request a 10 day trial key to try out the PRO features without buying the license. Just go to Help>License and click on the “Request 10-day trial” button and you will be redirected to our website for completing a simple request form. Shortly after submitting this form you will receive the trial key delivered to your email.
You will receive your registration key by email (usually takes several minutes, but in extremely rare cases can take up to 12 hours). You can enter the registration details into the Help/License window in one of three ways:
Option 1: Select the whole purchase confirmation email text, and clip it using the configured clipping hot key (Ctrl+F12 by default) – this is the recommended approach;
Option 2: Copy the email content to clipboard and then open the License window;
Option 3: Manually enter the registration details into the License window.
The regular PRO license is good for 1 year upon installation with free updates and support for the whole year. The regular PRO license continues to be valid after 1 year, but it is only valid for the versions released before this date.Updates/support are available upon renewal of your regular PRO license. The lifetime PRO license is as the word implies, carries updates and support for a lifetime. It is permanently valid for all past and future CintaNotes versions and doesn't require renewal.
So as mentioned,
CintaNotes was so light I almost did not notice any slowdowns and I was even using Photoshop, Word, Powerpoint, WinRAR, FastStone Image Viewer, PolyEdit Lite, EditPad, Faststone Capture alongside browsers (2) and music/music videos played in PotPlayer not to mention my security apps all running (Emsisoft, NVT_Exe Radar, MBAE, MBAM Premium alongside Process Hacker). Using it seems more than just a simple note taking application. I mean I use EditPad or PolyEdit Lite for note-taking (most often) but I manually have to do it all. With the Ctrl+F12 you get all say, from the browser, all the text that I need and the links/source address as well. That clipping hot-key is really great! Search is pretty much good (searches only from the word boundaries) and can search texts that you want fast. But I seem to see that unlike PolyEdit it does not support images and cannot format text color. It does support background color formatting. Backup feature is great! Synch function is fine by me (simple synch is enough for me) but some power users may find it lacking because it only supports Simplenote and Dropbox. Would be nice if they have image support like WordPad and PolyEdit (because for me while I work online I also get the images I need as of the moment with FastStone Capture) but come to think of it CintaNotes is a text-capture based "personal note management application tool" so maybe I am pushing it. Hmm..no Mac version though.
The PRO version will definitely add some more tools and ease of use for the power user. For the simple note taker the free version is more than enough. I would like to state that the "Help and Learning" section of the home page was really helpful as it guided me toward my spin --read and try it out. For the first time user the link is very helpful to them. All in all a CintaNotes is a great applicaion for text-capture based note taking with added bonuses!
Zaloguj
lub
Zarejestruj się
aby zobaczyć!
Zaloguj
lub
Zarejestruj się
aby zobaczyć!
Zaloguj
lub
Zarejestruj się
aby zobaczyć!
Zaloguj
lub
Zarejestruj się
aby zobaczyć!
Zaloguj
lub
Zarejestruj się
aby zobaczyć!
Zaloguj
lub
Zarejestruj się
aby zobaczyć!
 I really enjoyed it and you made me install the software.


